Peripheral vascular access education
Knowledge is key to understanding vascular access best practices. Christie’s clinical team has put together some basics to provide a valuable resource for healthcare practitioners.
Knowledge is key to understanding vascular access best practices. Christie’s clinical team has put together some basics to provide a valuable resource for healthcare practitioners.
Performing venipuncture and starting peripheral intravenous (IV) infusions are among the most challenging clinical skills you will ever have to master. Not all nursing schools offer enough hands-on learning, and hospitals commonly provide only limited opportunities for supervised practice. Even for the experienced clinician, IV placement can prove challenging depending on the patient and their pathology. This special guide is meant to provide a resource for some recognized best practices in peripheral intravenous access.
When choosing an appropriate vein for venipuncture, consider patient factors – such as:
If therapy is expected to last 6 or less days, a short peripheral catheter may be an appropriate selection. If therapy is to last more than 6 days, a peripherally inserted central catheter (PICC) line or midline catheter should be considered.
When the prescribed fluid and medications have a pH below 5 or above 9 and/or osmolarity greater than 600 Osm/liter, PICC line or other appropriate central vascular device should be considered.
When short peripheral catheters are to be used, venipuncture sites should be chosen on the distal area and work up the extremity. Subsequent venipunctures should not be made distal to a previous puncture site as fluid can leak into the subcutaneous tissue from this proximal site. The lateral surface of the wrist should be avoided for approximately 4-5 inches beginning just above the thumb as nerve injury can be a risk in this location.
Starting with the non-dominant hand on adults is a good place to begin your assessment; this allows for use of the dominant hand for routine activities of daily living. Older adults who have poor skin turgor with minimal subcutaneous tissue present more of a challenge, and the hand vessels are generally not optimal. In pediatric patients that have not started to walk, other site options include the feet or lower extremities. Scalp veins are sometimes used in young infants. VeinViewer vein illumination can be very helpful in these cases to choose a better target for cannulation.
Remember insertion of a short peripheral catheter in the antecubital fossa vessels restricts movement and has a higher risk of nerve injury. Use of large gauge peripheral catheters could easily impede blood flow around the catheter, increasing the risk of mechanical and chemical damage to the vein wall. Short term procedures, like contrast injection for CT radiology may require a large gauge; however, removal following the procedure will reduce the risk of complications.
Each catheter can only be used for one venipuncture attempt. If that attempt fails, a new catheter must be used.
VeinViewer technology can also provide valuable information regarding valves, bifurcations, and anomalies such as terminating vessels. These can be problem areas on any vein, in any area and on any patient. These anatomical challenges cannot be seen with the naked eye nor felt with palpation.
 Over-the needle catheter are ideal choices for veins located in the hand and forearm. Below are examples of catheters from 24 gauge (most common in pediatrics) to 18 gauge (larger bore).
Choosing the right short peripheral catheter size depends on several variables. While 20 gauge is the most commonly used, most routine fluids and medications, even blood transfusions, can be safely infused through a 22 gauge in adults. Use of winged needles should be avoided for all types of infusions. Refer to your hospital guidelines about appropriate catheter sizes for the smallest gauge catheter capable of delivering prescribed infusion therapy.
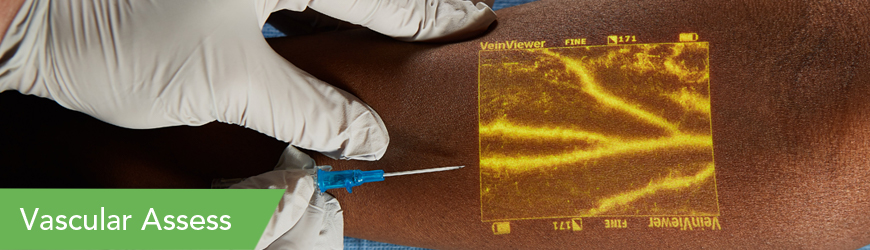
No medical device alone can eliminate the potential complications of IV therapies, nor can a device ensure the vein is cannulated in one attempt. VeinViewer technology can provide a level of assessment information that is not available to the naked eye alone or sense of palpation. VeinViewer can help guide you to a vein that is the best for your particular patient.
VeinViewer uses harmless near-infrared (NIR) light, similar to the wave length of pulse oximetry. NIR light is projected onto the surface of the skin; hemoglobin absorbs the NIR and surrounding tissue disperses it. The depth of penetration of VeinViewer is up to 10 mm deep for peripheral veins and up to 15 mm deep for blood patterns, blood within and without of the vein. Depth of visualization is dependent on the anatomy and condition of each patient.
Remember nothing is superior to your common sense and clinical assessment of the vein. VeinViewer is an adjunct imaging tool to provide you with additional assessment information so you can make the best venipuncture decision.
For additional clinical education opportunities contact a Christie expert today by calling 877 SEE VEIN.
Watch here for details on VeinViewer technology and its benefits.
VeinViewer’s breakthrough light technology has greatly improved vascular access – Pre, During, and Post Benefits.